Vextractor Crack Activation Key Free [Latest] 2022
Vextractor Crack Activation Key Free [Latest] 2022
Its main characteristic is it has many layers. We called them layers because this is the only way to manipulate the graphic. Most of them have specific functions that you can use to make some changes in your graphic. There are buttons in the bottom of the window, which allow you to go forward or backward a layer. But you can also create a new layer by right clicking and choosing from the available options. You can also use the menu, which we can see on the left side of the window, to choose your favorite tool. There are many different options that you can use to modify the layers. Among them are the erase tool, which allows you to erase specific parts of the layer, the layer mask, which allows you to remove all parts of the layer that you want to hide, the fill and clear tool, that allows you to color specific parts of the layer, and the clone tool, which allows you to clone the image by selecting and cutting a part of it, then paste in another part, where it is needed. We have many layers, one for each tool, and you can choose the one that you prefer. We have also the resize tool, which allows you to resize any layer of the graphic to any size you want. Of course, if you want to reduce the size of your layers, simply choose the option to reduce the size of the layer. In addition, we have the go to layer tool, which allows you to go to a specific layer by clicking on it. We have an option of tabs, which allow you to manage more easily the tools and the layers. You have many options to modify the layers, so you can create a graphics by selecting one of them, but you can also create a layer by right clicking in the graphic and choosing the create layer option. On the top of the graphic window, we have the window title, which gives the name of the graphic. You can choose to create a new project, an existing project or open an existing project. You can have many projects, all at once, but it would be very complicated for you. Therefore, you have the option of new project, which creates a new project. The existing project can help you to have an image with multiple projects, which you can open and work on each one of them. The existing project allows you to add some more tools to the right side of the window, and you can modify it as you want. A tutorial on how to create a textured pixmap layer in Photoshop or Illustrator
Vextractor Download
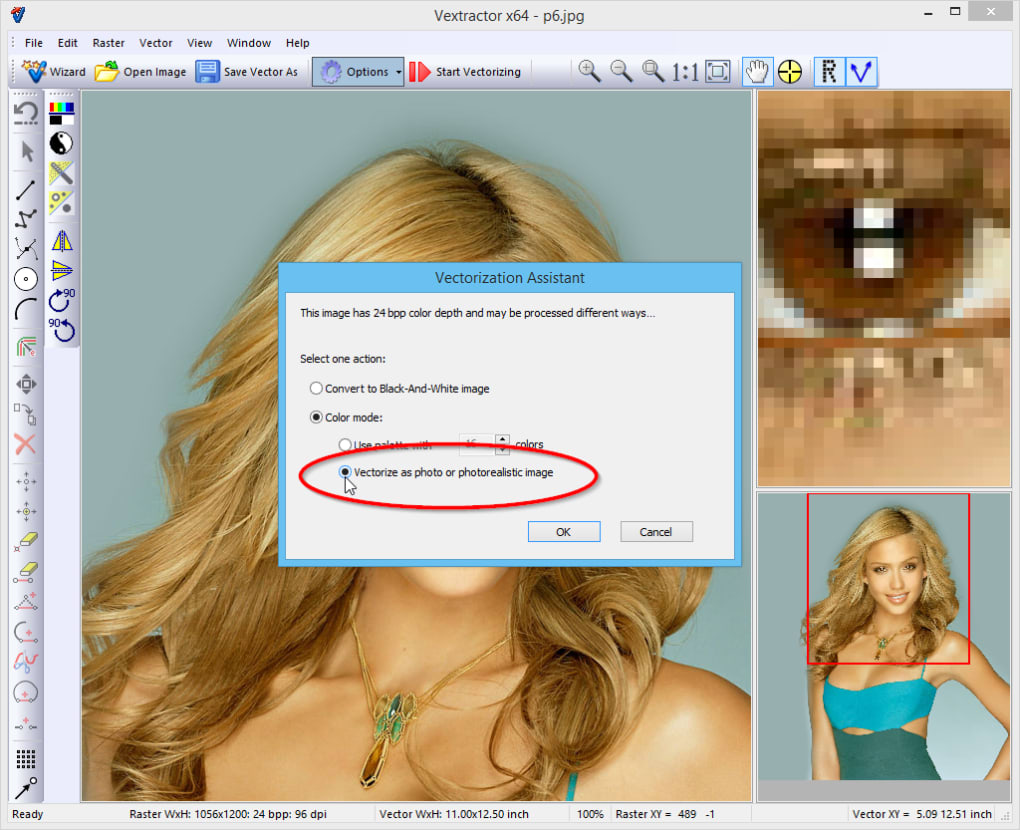
Vextractor Torrent Download is a comprehensive graphic editing application designed to transform raster images into vectors with various file types. It comes packed with a few intuitive tools that should be quickly to figure out. Professional-looking interface with multiple panes The GUI is easy to navigate and has a well-structured layout. Images can be scanned or opened from file with the BMP, JPG, TIF, GIF, TGA, PNG, ICO and other formats via the file browser only, since the drag-and-drop method is not supported. The raster image can be previewed within the main frame next to the original photo in a separate pane, along with the vector. Vector and raster toolbars The vector toolbar lets you select objects, create new lines, polylines, spline polylines, circles and arcs, edit an object's properties, move it around, delete or duplicate it, as well as to move and delete points. Meanwhile, the raster toolbar enables you to customize the color palette, invert colors, remove speckles and isolated spots, mirror the photo horizontally or vertically, as well as rotate it by 90 degrees clockwise or counter-clockwise. Additional vector and raster options More vector and raster effects can be found in the menu bar. For example, it is possible to set the vector coordinate system, examine and modify vector size and reference information (e.g. measurement unit), filter polylines and remove all vectors, or convert the image to greyscale or black and white. You can also configure image segmentation by tweaking the smoothing factor, color tolerance and gradient threshold, use a canny edge detector and adjust the Gausian standard deviation, high and low threshold, and apply smart blur effect. Vectorization wizard and batch processing A simple wizard is accessible to users looking to carry out a task in no time. They simply need to select the image from file or scanner, pick the type (e.g. photo, drawing, map, outline), select the conversion method (e.g. convert to monochrome, edge detection), apply filters (e.g. median, despeckle), and vectorize the picture automatically or by specifying parameters manually. A batch processing mode is available for raster pre-processing when it comes to converting the image to black and white or processing it in color. For the first option it is possible to depeckle the pic by indicating the radius and threshold. What's more, the vector can be saved to DXF, DXB, SHP, EMF or other vector file types. Other program options Polyline ends and nodes can be shown in the project, users can zoom in and out, the interface language can be changed, the toolbars can be hidden from sight, while the vector can be easily saved to file or backed 972550f159
Vextractor
Enjoy this cool wallpaper. By double-clicking the downloaded file, you can change the wallpaper to your liking. After playing for some time, you will want to update your wallpaper. Every time you do this, you can change the new wallpaper with the same double-click. No additional software or setup required. First created in the following years: * 2001(A rough estimate) Y-Axis The cost of one well in a year, expressed in thousands of dollars. X-Axis The duration of the project in years. The Value chart should have been animated. Perhaps it can be made by using "animate" of the python language. I did not find such function. A python example is shown below. The the "scatter" (blue and black) images are shown below. from matplotlib.animation import FuncAnimation import matplotlib.pyplot as plt import numpy as np def draw_costs(x, y): """Draw the costs in costchart""" plt.gca().cla() plt.ylabel('Cost') plt.xlabel('Years') x0, x1 = x y0, y1 = y fig = plt.figure(figsize = (10,10)) ax = fig.add_subplot(111) def animate(t): """Animation drawing the costs from t=0 to t=1""" line1 = plt.plot(x0, y0, 'bo', marker='o', mfc='none') line2 = plt.plot(x1, y1, 'ro', marker='o', mfc='none') plt.gca().cla() plt.gca().xaxis.set_tick_params(which='major', length=0.5) plt.gca().yaxis.set_tick_params(which='major', length=0.5) plt.gca().xaxis.set_ticks([]) plt.gca().yaxis.set_ticks([]) plt.gca().xaxis.set_ticks_position('bottom') plt.gca().yaxis.set_ticks_position('right') pl
What's New in the Vextractor?
Drawing 2D Extras, Enhanced AutoView, and Viewfinder: Bring new features of 2D design to AutoCAD, with revamped 2D drawing tools and an improved user interface. AutoView offers a new layer view, with an on-screen legend and review of the drawing layers (video: 2:25 min). Enable 2D drawing in 3D, and vice versa. For example, you can import 3D drawings into AutoCAD and add a 2D face to a 3D polygon. Or, create an ortho view from an existing 2D drawing that contains features in 3D space. For more information, visit The technical contents of this release are available at For news and information from Autodesk, follow us on Twitter @AutodeskCareers or @Autodesk. Summary of new features in AutoCAD 2023 Drawing 2D Extras 2D drawing tools such as aline, polyline, polygon, freehand, straight, and circle, have new “extras” to add to them, so you can quickly create common 2D drawings. You can also import or export these drawings to PDF, JPG, or PNG. With the polyline and polygon tools, you can choose between a narrow or wide line or polygon, with a uniform width (or, you can also use different line widths at different lengths). With the polyline and polygon tools, you can easily create a border around your drawing. You can even define the color of the border. With the aline tool, you can draw a line at any angle, or from any point in 3D space. With the straight tool, you can create a continuous line in 2D space, or connect several points into a path. With the freehand tool, you can use the mouse to draw freehand shapes. With the circle tool, you can draw circles and ellipses, or create a circle template. You can use these drawing extras in combination with other drawing tools, or with existing drawing features such as text, annotations, dimensions, and annotation styles. For example, you can use the polyline and polygon tools to create complex shapes
System Requirements:
Introduction All of us want our games to look great. The truth is, sometimes the software you’re using for that purpose is running a little sluggish. Sometimes it’s a combination of hardware and software and something has to give. Your game’s graphics are going to be the first thing that’s going to be affected by this; perhaps not to a dramatic degree but you’ll still have to be careful. Even when your game looks awesome, you’ll still want it to be able to handle the occasional lag.
DEXembed
SB Cleaner Standard Edition
Chat Translator for Yahoo Messenger
